
Home Lab
Welcome to my home lab environment! This page serves as a documentation hub for my personal home lab setup. Feel free to explore the hardware, software, and configurations that make up my lab.
Table of Contents
Overview
Real-World Attack Simulations: Understanding the power of penetration testing as I replicate authentic attack vectors. Understand vulnerabilities and the importance of proactive defense.
Vulnerability Exploration: Delve into vulnerabilities, from software bugs to misconfigurations. Grasp their potential impact on security posture.
Toolbox Exploration: Discover industry-standard tools and frameworks. Gain insights into their usage, effectiveness, and how they bolster security.
Defense Strategies: It’s not just about attacks; robust defense matters. Explore the implementation of firewalls, intrusion detection systems, SIEM and more.
Shared Knowledge: Find invaluable resources, courses, and reading materials that fuel my growth in cyber security as I take certifications.
Malware Analysis: With a controlled environment, I dissect and analyze malicious software to understand its behavior, origins, and potential impact.
Network and Servers
Here’s a list of the components that form the backbone of my home lab:
Server Host: Optiplex 7040 SFF, i5-6500, 16GB RAM, 256GB SSD, Hostname: UKHOST01, OS: Proxmox
Workstation: 16GB RAM, 1TB Storage. Hostname: PC01, OS: Windows 11.
Network Switch: NETGEAR 5 Port Gigabit Network Switch (GS105) & Virtual switch via host.
Firewall: Virtual OPNsense.
Storage Array: Onboard storage via Host. Exploring NAS options.
Malware Analysis: Remnux/Cuckoo
Additional Hardware: I plan to extend my homelab with additional hardware, likely to explore Optiplex form factor options to host the vuln lab.
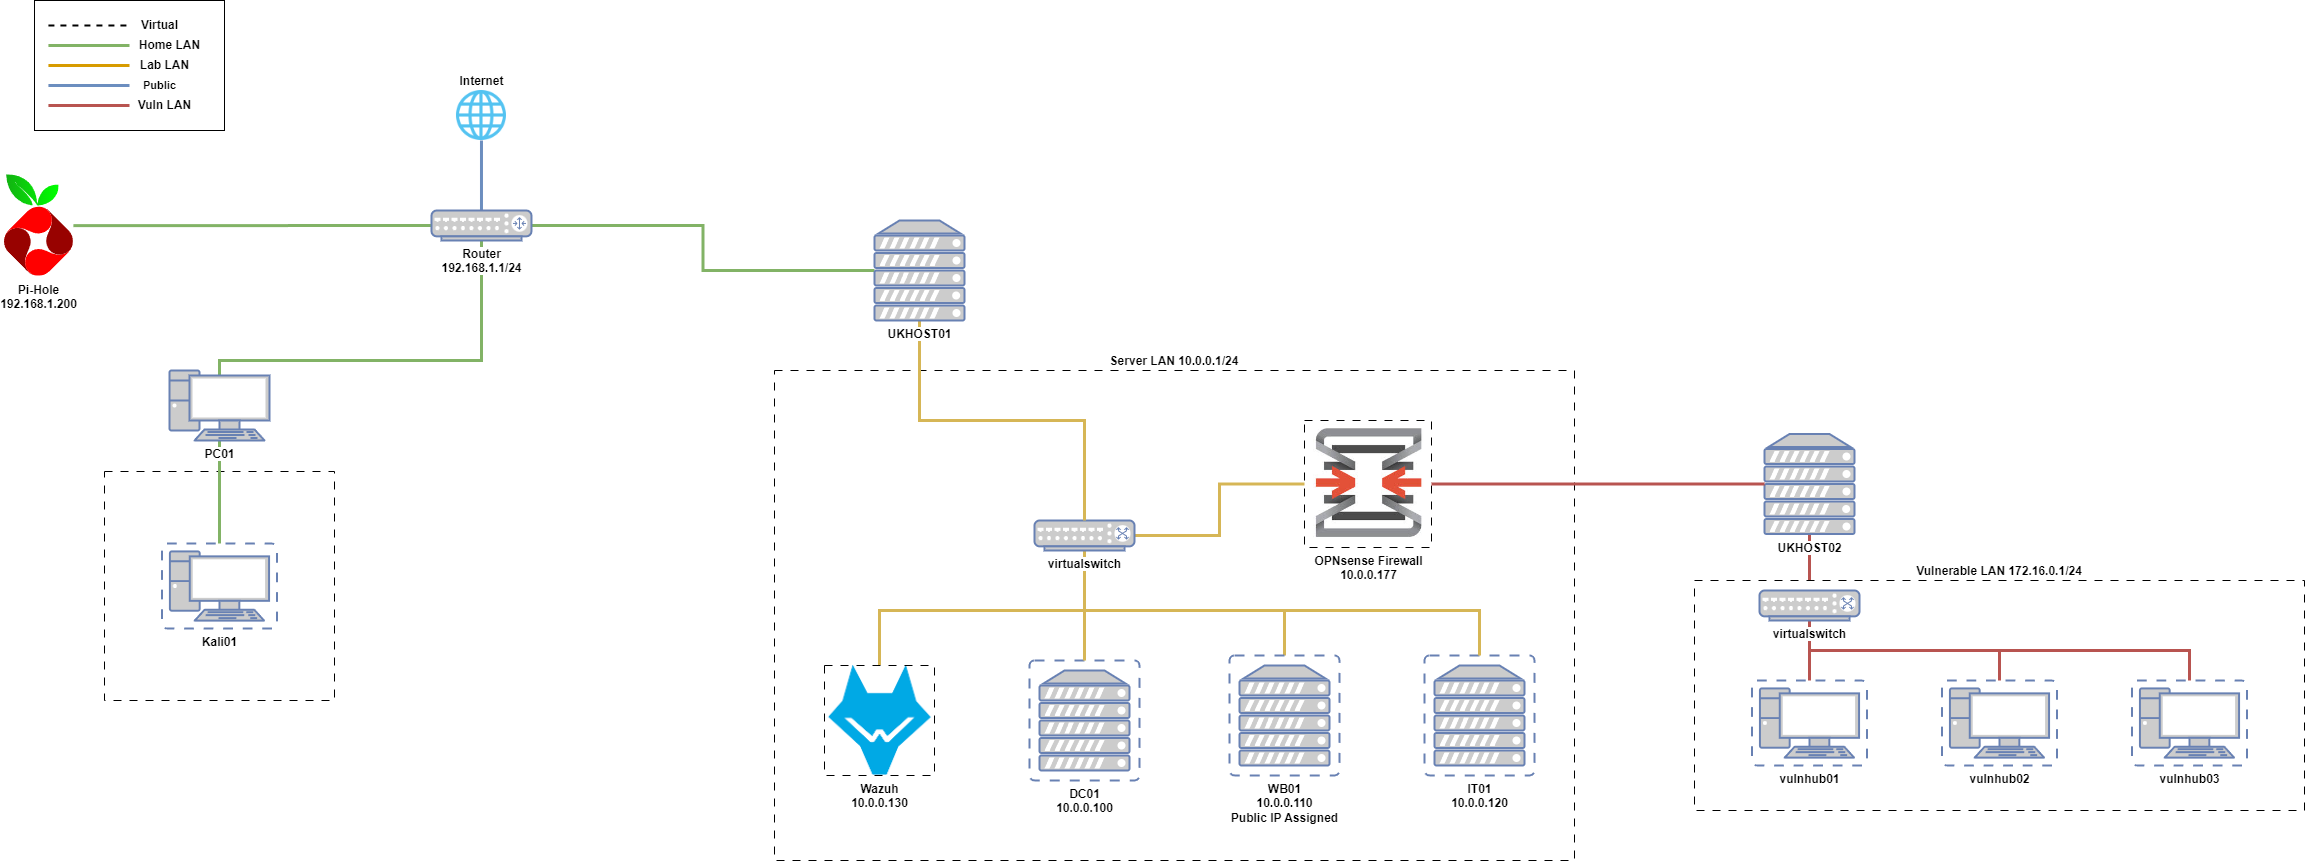
Network Diagram
Virtualization
Hypervisor: Proxmox.
Templates: Badblood - Domain Controller
Services and Applications
Domain Controller: BadBlood to populate https://github.com/davidprowe/BadBlood. Also look at BloodHound for attack paths.
DNS Server: Domain Controller will host DNS for Server LAN. Pi-Hole will handle DNS for Home PC but exploring options.
Web Server: TO DO Find vulnerable web server images.
Vulnhub Host: TO DO Find Vulnhub images.
Database Server: TO DO Find vulnerable database images.
Monitoring Tools: Currently using: Wazuh. Possibilities: Zeek, Suricata, The Elastic Stack.
Configuration Scripts
Any automation scripts or configuration files to set up my lab environment:
Provisioning Script: Link to provisioning script
Network Configuration: Link to network configuration files
Active Directory population: https://github.com/davidprowe/BadBlood
Resources
Provide links to external resources, guides, or tutorials that have helped me set up and maintain my home lab:
High Priority Tasks
Configure OPNsense Firewall: Set up basic security policies and NAT to protect the lab.
Implement VLANs: Segregate traffic for different lab segments (Red Team, Vulnerable LAN, Server LAN).
Set Up Wazuh SIEM: Get the SIEM system running for log collection and analysis.
Install and Configure DNS/DHCP Services: Centralize network services management on DC01.
Deploy Windows Server VM with Active Directory: Essential for practicing enterprise network management.
Network Connectivity Verification: Ensure all lab devices can communicate as intended.
IP Address Management: Verify no conflicts and set up DHCP server with proper scope.
Deploy Kali VM: Set up for penetration testing and security research.
Create Metasploitable/Vulnhub VMs: Set up vulnerable LAN for penetration testing practice.
Network File Share: Make accessible to the Server LAN and PC01.
Deploy IT Generic Server.
Deploy Win 10 Client PC.
Install Wazuh agents on all VMs.
Medium Priority Tasks
Install IDS/IPS: Use Snort or Suricata to monitor network for malicious activities, exploring options as a container.
Set Up Vulnerability Scanner: Integrate OpenVAS to identify potential vulnerabilities, exploring options as a container.
Implement Backup Solution: Ensure data redundancy for critical VMs and configurations.
Deploy Network Monitoring Tool: Use Nagios Core or Zabbix for real-time network status.
Integrate Log Management: Incorporate Graylog or ELK Stack for advanced log management.
Malware Lab: Deploy and implement a safe enviornment to detonate malware for analysis.
Deploy dummy data for AD: Using Badblood (https://github.com/davidprowe/BadBlood).
Low Priority Tasks
Install Endpoint Detection and Response (EDR): Configure TheHive Project or OSSEC for detailed monitoring and alerting.
Web Application Security: Set up OWASP ZAP or Burp Suite Community Edition for web app testing.
Red Team Tools: Add additional ParrotOS, Kali Linux, BlackArch, or ArchStrike VMs for diverse penetration testing environments.
Set Up Web Application Firewall (WAF): Configure ModSecurity with the OWASP CRS.
Additional Projects
Install Vulnerable Systems: Get VulnHub VMs or set up DVWA for targeted practice.
CTF Challenges: Set up CTFd to host or practice cybersecurity competitions.
Documentation and Wiki: Start a DokuWiki or MediaWiki for documenting lab configurations and procedures.
Physical Lab Security: Ensure the physical security of lab equipment.
Migrate Hosting: Migrate the hosting environment to new hardware and proxmox hyper visor.
VPN: Access lab remotely, configure a VPN on the firewall to ensure secure access.
War Room Scenarios: Set up red team/blue team scenarios within your lab for practical cybersecurity experiences.
Updates and Patch Management: Regularly update and patch all systems, especially the OS running on UKHOST01 and Kali machine.
CIS and Group Policies: Implement Group Policies through Domain Controller to manage security settings across machines.
Penetration Test: Perform a full scope penetration test.
Vulnhub Labs
Beginner Level
Kioptrix: Level 1 (#1): A great starting point for beginners. It focuses on basic vulnerabilities and common misconfigurations.
URL: https://www.vulnhub.com/entry/kioptrix-level-1-1,22/ Mr-Robot: 1: Inspired by the TV show “Mr. Robot,” this VM is designed for beginners and encompasses a variety of interesting challenges.
URL: https://www.vulnhub.com/entry/mr-robot-1,151/ DC-1: This is a deliberately vulnerable Ubuntu VM. It’s designed to be a somewhat realistic scenario to introduce beginners to penetration testing.
URL: https://www.vulnhub.com/entry/dc-1,292/
Intermediate Level
Toppo: 1: Good for intermediates, focusing on basic vulnerabilities with slightly more complexity than the beginner VMs.
URL: https://www.vulnhub.com/entry/toppo-1,245/ SickOs: 1.2: This VM is focused on leveraging less common vulnerabilities and misconfigurations, providing a moderate challenge.
URL: https://www.vulnhub.com/entry/sickos-12,144/ Stapler: 1: Offers a variety of ways to reach the goal, suitable for intermediate learners looking to try different penetration techniques.
URL: https://www.vulnhub.com/entry/stapler-1,150/
Advanced Level
FristiLeaks: 1.3: Aimed at more experienced practitioners, this VM requires complex problem-solving to exploit.
URL: https://www.vulnhub.com/entry/fristileaks-13,133/ HackLAB: Vulnix: This VM requires advanced enumeration and exploitation techniques, presenting a realistic challenge to experienced users.
URL: https://www.vulnhub.com/entry/hacklab-vulnix,48/ Lord of the Root: 1.0.1: An advanced-level VM that tests deep understanding and exploitation skills.
URL: https://www.vulnhub.com/entry/lord-of-the-root-101,129/
For Practice and CTFs
Symfonos: A series of VMs that are progressively challenging, and themed around Greek mythology. They’re great for practicing skills needed in Capture The Flag (CTF) competitions. URL: Search for “Symfonos” on VulnHub for various levels: https://www.vulnhub.com/